
Many woodworking beginners have the same struggles: lack confidence, patience, and poor work quality. These basic tips can make all of the difference. These are 15 essential tips for pallet woodworking. Each of them will improve your results. Using a power saw is a good example of this problem. These are just a few of the simple, yet effective tips to woodworking with pallets. A piece of thin sandpaper can be taped to the back of the workpiece to prevent it from slipping onto the bench.
15 essential tips for pallet woodworking
Here are some essential tips for pallet woodworking before you get started. This type of wood can be dangerous so make sure you have safety gear on hand and a stable work surface. To secure your pallet while you're cutting, use wood clamps. Make sure that you follow the safety guidelines of each tool. When working with pallet wood, it is best to keep your hands and fingers clean.
It can be difficult to disassemble a pallet. You need patience. Avoid getting caught up in a heap of scraps and nails. This will enable you to work quicker. Protect your eyes by wearing thick gloves and protective eyewear. You must arrange the wood according its size and color after disassembling a pallet. If you don't, nails can stick out and make a big hole in the wood.

Use power saws
There are many options for power saws to help you get started in woodworking. Some are small and simple, while others are much more powerful and can be used for more elaborate tasks. There are pros and cons to each type of tool, so it is important that you decide what kind you need before you buy. There are two types of power saws, the table saw or the jigsaw. The table saw is great for cutting wood and plastic.
A portable circular saw is essential in any toolbox. Using a portable saw allows you to get a clean cut without the mess or hassle of a table saw. A power saw is also great for projects that require a fast, accurate cut. Safety is the most important aspect of power saws. Learn how to properly care for your blades and what protective gear you should use.
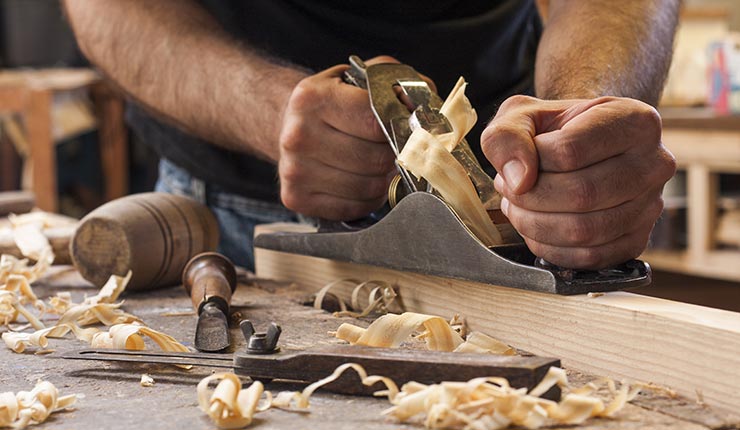
Finishing: Keep workpieces off the bench surface
Finishing should not involve putting workpieces on the workbench. Consider removing workpieces from the workbench when finishing woodwork. A shiny finish on a workbench will cause your workpieces to slide across the surface, and can crack when you hit it with a tool. Danish Oil or boiled oil linseed oil are good options. A wall is able to support a workbench. Windows can also be used to shine useful light on it.
Tape thin sandpaper to the back with duct tape
There are many different types of sandpaper. Some have a cloth backing, while others are made of PET film or fibre. Backings can be attached to the paper, or they can create their own support structure. For irregular surfaces, a flexible backing works best. A rigid backing may cause scratches and rips, which can lead to a less polished finish.
To make your sandpaper easier to use, attach some old duct tape to the back. These strips are ideal for sanding spears, dowels and staffs. They can also be easily cut to fit any shape.
FAQ
What is the difference between plywood and particle board?
Plywood is a combination of layers of wood, which are then pressed together under high pressure. Plywood can be cut to different thicknesses. It's commonly used as flooring and cabinets. Particle board is made from sawdust mixed with resin and then compressed into large blocks. It's commonly used for home improvement projects. Both boards can be cut easily and are both durable.
What kind wood should I use for my project?
There are many wood types that are used in woodworking, including oak, maple and birch. Each type of wood has unique characteristics that affect the look and feel of the final product. Oak, for example, tends be darker and more hard than other woods. Birch is lightweight and soft while mahogany is heavier and denser. There are two options: solid wood and veneers. Veneers consist of thin sheets made from wood and glued together to form a single layer.
Where can I purchase woodworking supplies
There are plenty of places where you can find everything you need to start out. You could go to your local hardware shop or visit websites such as Amazon.com.
For furniture and other materials that you can reuse, check out flea markets and garage sales.
How do I identify the type of wood that I am dealing with?
Always read the label when purchasing wood. The label should detail the wood species, its moisture content and whether it has been treated or not.
Where do you start when it comes to woodworking?
You can learn the most effective way to build furniture by actually building it. While you will need tools, mistakes are inevitable, but you will learn the ropes if you persevere.
Choose a project that interests you. It can be something as simple and small as a box, or large-scale as an entertainment center. Once you've decided on a project, find a local woodworker who specializes in that kind of work. Ask him or her for advice on what tools you'll need and where to find them. You might even ask whether there's someone else you can talk to who does this kind of work.
Can I make my living doing this job?
Yes! Many woodworkers are already doing so. According to the U.S. Bureau of Labor Statistics' (BLS), in May 2012 the median annual wage of woodworkers was $34,000 This is more than the national average of 31,000 per annum.
How much should a skilled woodworker earn per hour?
The hourly rate for a professional woodworker varies depending on many factors, including skill level, experience, availability, location, and other variables.
A skilled woodworker can expect an hourly rate of $20-50.
A less skilled woodworker can charge as low at $10 an hour.
Statistics
- If your lumber isn't as dry as you would like when you purchase it (over 22% in Glen Huey's opinion…probably over 10-15% in my opinion), then it's a good idea to let it acclimate to your workshop for a couple of weeks. (woodandshop.com)
- The U.S. Bureau of Labor Statistics (BLS) estimates that the number of jobs for woodworkers will decline by 4% between 2019 and 2029. (indeed.com)
- The best-paid 10 percent make $76,000, while the lowest-paid 10 percent make $34,000. (zippia.com)
- In 2014, there were just over 237,000 jobs for all woodworkers, with other wood product manufacturing employing 23 percent; wood kitchen cabinets and countertop manufacturing employing 21 percent. (theartcareerproject.com)
External Links
How To
How to stain wood
Stain wood is a process that involves applying chemicals to the surface of wood, which changes its color. The wood will turn from white to brownish-red due to the chemical reaction. Oak is the most commonly used wood for staining, but other woods can also be stained.
There are many options for applying stains to wood surfaces. Mixing the stain in a solvent such as turpentine and spraying it onto the wood is one method. Others use a solution made up of water and dye, which is then applied directly onto the wood. You can mix stains into varnishes or paints to make them part of your finish coat.
Preparing the surface for staining wood is the first step. Clean the wood to get rid of any grease, dirt or other substances that might be detrimental to the stain's application. Sanding smoothens scratches and rough spots. Then you must decide what kind of stain you want to use. There are two types of stains that can be used: penetrating and non-penetrating. Penetrating stains penetrate deeper into the wood than non-penetrating ones, making them ideal for dark colors such as mahogany. The best non-penetrating colors are those that work with light colors like maple.
Once you have decided on the stain type that you want, get your tools ready. The best tool for applying stains is a paintbrush. It allows you to evenly distribute the liquid over the surface. You should also have some handy rags to wipe up excess stains after you finish painting. If you intend to mix the stain yourself you will need enough containers to hold all the components.
After you have prepared your materials for staining, clean the area. Use soap and warm water to remove dust and grime. Wipe down all furniture pieces with a dampened cloth and clean water. Make sure you eliminate any loose debris, especially if you plan to stain darker wood.
Apply the stain. Next, apply the stain to the furniture by starting at one end. Slowly and carefully work your way along the grain to reach the opposite end. Be careful not to let the stain drip off the wood's edge. Allow the stain to dry completely before you move on to the next step.
To protect the painted surface, apply a coat of clear polyurethane sealant. Apply three coats of polyurethane sealer. Let the third coat dry overnight before you sand the final coat.