
You should think about how difficult carving wooden spoons is if you are thinking of doing it. You can carve any type of wood. However, certain woods are more challenging than others. You should choose a wood that is easier to carve if you are just starting out, such as cherry or another softer hardwood. You have many options when carving spoons.
Use a hatchet
It is much easier than you think to use a hatchet for carving a spoon out of wood. To make a spoon from wood, you need to first find a section that is un knotted and at least three-times the thickness of your spoon. Woods usually have a central growth circle that falls out and leaves a hole. This can be avoided by slicing the wood down the middle. To split the wood, a fixed-blade knife or an exacto knife can be used.
Split a piece and remove bark and branches. Next, mark the handles by drawing horizontal lines under the circles. Use a handsaw to saw down to these lines. The horizontal lines will serve as a shelf to hold the spoon. The shelf will prevent the wrong bits of the spoon from breaking off during the carving process. This step can also be used to stop the axe tearing off pieces of wood which were not cut.
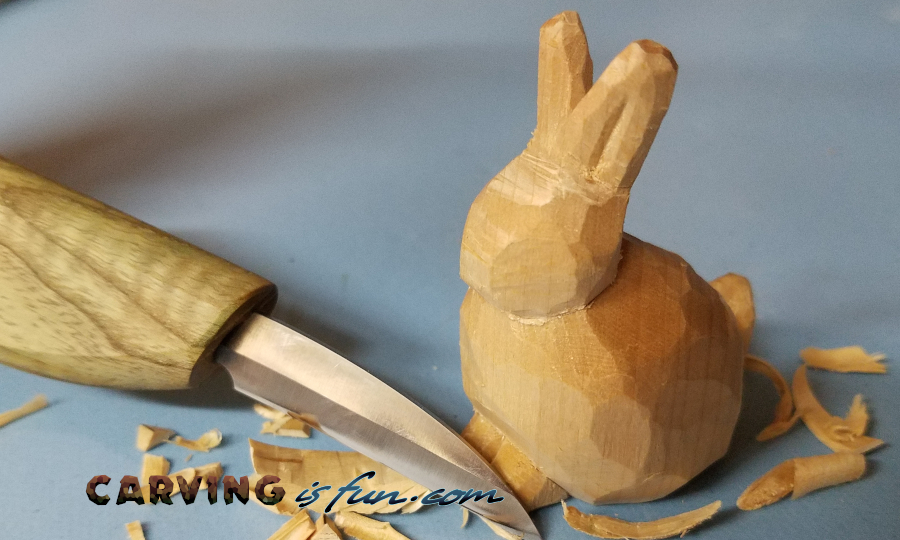
Use a knife
Before carving a wood spoon, you need to split the piece of wood in half. A heavy log or branch is best for carving. The shape of the wood spoon will be largely determined by its natural curve. The center growth ring should also be visible as a darker line. Once you have determined the shape of the spoon, you can then proceed to carving the bowl.

The process of carving spoons out of wood can be done with a knife. It's not difficult but takes patience and practice. A pencil or charcoal can be used to trace the spoon's outline. While it is common to use an axe for rough cutting, a knife and a baton are more convenient and safer. A knife and baton are another way to split the wood.
Use a poison ivy plant
Make a spoon out of poison ivy if you want to be unique. The vine will eventually die on the tree, but not before it leaves behind poison ivy oil and a nasty rash. You should wear long pants, long sleeves, gloves with gauntlets and gloves with gauntlets before you try this.
Wear gloves and a mask while carving spoons from wood. You don't want poison ivy oil to be all over your hands and face. It is actually a type wood that looks similar to other woods, which is the poison ivyvine. Bill Essex creates knives from this vine, and sells them online.
A knife gives you the ability to achieve a smooth finish
A little practice is required to achieve a smooth finish when carving wooden spoons. With fresh wood and sharp knives, it is possible to create spoons that don't have any facets or burrs in the mouth. Even though it takes some practice, smooth spoons are possible.
Draw the shape of your spoon after you have chosen the design. For easier carving, you will want it to be very simple. The handle should be drawn so that it runs along the grain. Next, hollow out the bowl by using a gouge or crook knife. Once you have hollowed it out, you can start carving the handle. You should work in the direction of the north to the south.
Carving wood: Storing wood
If you're a beginner, you're probably wondering where to find wood for carving spoons. You have many options. One is to ask local lumberyards and mills where their wood comes from. You can also request power companies to remove limbs from trees. Power companies will often send their tree trimmings through chippers. Some of these can be used to create spoons.
To keep the wood soft and fresh, you can soak it with linseed Oil or water. You can also wrap your wood in plastic, and keep it in a cool place. Make sure the wood is dry before you store it. If the wood is not dried properly, it could easily rot. To avoid this problem, you need to keep the wood in a shady, cool area and store it properly. Avoid extreme temperature changes, and don't expose wood to excess moisture.
Keep a sharp knife handy
It is crucial to maintain a sharp edge when carving a spoon from wood. This will ensure a smooth finish. Wood can absorb oil and spice if it is not tightened. For carving spoons, fruit and nuts trees are the best woods. Cherry and walnut are valued for their beautiful grain patterns, ease of carving, and high quality. These trees are also native to Arkansas and make excellent carving materials.
Always use the appropriate cutting tool to carve a spoon. When using a knife, it is important to observe safety precautions. Soak soft woods in water before carving. Wrapping them in plastic will help to retain the moisture. Pre-dried hardwood will be more difficult to carve, but it won't crack as easily.
FAQ
Do you have any suggestions for starting a woodworking shop?
It can be difficult to start a woodworking shop. But if you're passionate about your hobby, you won't mind putting in the effort. You will probably love the challenge of starting your own business.
Remember that you may encounter unexpected problems when starting a new venture. You might run out money, or you may have to borrow unexpectedly. You might find customers not willing to pay the amount you expected. You need to be ready for these situations if you want to survive.
One good tip is to set up a separate bank account specifically for your business. You will always know how much money you have coming in.
Where can I get free woodworking plans?
You don't need to purchase any books or magazines to find free woodworking plans. You just need to search Google. Simply type "free woodworking” into the search box and you'll find hundreds of websites that offer free plans.
Do you know anything more about woodworking?
It is easy for people to overlook the work involved in furniture making. Finding the right kind of wood is the most difficult part. There are so many varieties of wood available that choosing one can be difficult.
A problem is that wood doesn't have the same properties. Wooden can split or crack, while some woods may warp. You must take these things into consideration before purchasing wood.
How do I determine what kind of wood my project is made from?
Always inspect the label when buying wood. The label should provide information about the wood species, moisture content, and whether preservatives have been used.
How long does it take to finish a piece of furniture?
It depends on which wood you choose, how complicated your design is and what amount of finishing you apply. For example, hardwoods require more maintenance than softwoods. Hardwoods are also more expensive than softwoods. But they last longer, and resist moisture better. The process of finishing a piece of furniture typically takes anywhere from one week to three months.
What is the difference between a hobbyist or a professional woodworker, and how can you tell?
Hobbyists love making things from wood while professionals are more concerned with the quality of their work. Hobbyists tend to take pride and share their creations with family and friends. Professionals will spend hours researching designs and then begin to create a project. They will meticulously plan every detail of their work from choosing the right materials to finishing it.
Statistics
- If your lumber isn't as dry as you would like when you purchase it (over 22% in Glen Huey's opinion…probably over 10-15% in my opinion), then it's a good idea to let it acclimate to your workshop for a couple of weeks. (woodandshop.com)
- In 2014, there were just over 237,000 jobs for all woodworkers, with other wood product manufacturing employing 23 percent; wood kitchen cabinets and countertop manufacturing employing 21 percent. (theartcareerproject.com)
- Most woodworkers agree that lumber moisture needs to be under 10% for building furniture. (woodandshop.com)
- Overall employment of woodworkers is projected to grow 8 percent from 2020 to 2030, about as fast as the average for all occupations. (bls.gov)
External Links
How To
Here are some tips on how to drive nails in wood
When driving a nail into wood, it is important to first choose the correct size and kind of hammer. The most common types of hammers are claw hammers, sledgehammers, mallets, ball peen hammers, and hatchets. Each type has its strengths and weaknesses. A claw hammer is best for hitting nails or hard objects. However, it can be difficult to pinpoint exactly where the blow will land. A sledgehammer allows you to hit large areas simultaneously, but it is too heavy and cumbersome to use for small tasks.
After selecting the right hammer, you will need to place your hand flat against one side of the head. The handle should rest comfortably in your hands. Hold the handle in your hand, but don’t force it too hard that you break. You should hold the hammer straight-up, with your wrist still relaxed. Then swing the hammer back toward the ground, aiming for the center of the nail. You should feel the impact of your hammer hitting the nail. If you're having trouble getting the hang of swinging a hammer, practice with a block of wood until you get the rhythm down.
Once you are ready to drive the nail, place the hammer close to your body. You will need to position the nail so it is parallel to the wood. Keep your focus on the tip of each nail. Swing the hammer forward, and then move the hammerhead. Keep doing this until you are comfortable with the swing. Once you've mastered the technique, try adding power to your swings. Hold the hammer high above your shoulders and pull it down. This way, you'll be able to put more energy behind your blows.
Once you've made the first nail hole, take out the hammer. Use a pry bar or screwdriver to pull out the rest of the nails. To prevent splitting the wood, ensure you keep the nail heads flush against the board's surface.